Birthday Party Plan with an Art Theme
Contents
Get a little creative with your child’s next birthday party and add some artistic flair to the food, decor, and activities. You’ll surely have a work of art on your hands when you throw this awe-inspiring Art Party. Below, we have everything planned out for you from the food to the decor to the activities!
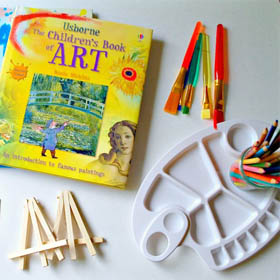 For the decor, start with a blank canvas and splatter in a rainbow of colors, some art supplies, and a few art books; your guests will appreciate the look. Mini easels make great place card holders and paintbrushes can be used as chopsticks. It’s fun to use your imagination!
- Use mini easels as place cards
- Fill mini clear paint cans with candy (assorted colors of M&Ms, pretzel crayons standing up in sanding sugar, etc.)
- Decorate with crayons, markers, pencil crayons, and chalkboard signs
- Use palettes in place of plates
- Make a tablecloth from a paint-splattered painter’s tarp
- Serve food on colorful platters
- Fill small vases with pencils, scissors, foam paintbrushes, regular paintbrushes, etc.
- Stack art books around the space
As far as activities go, an art party is all about art. Kids of all ages will enjoy painting and coloring up a storm, making Coffee Filter Butterfly Magnets, Styrofoam Prints, and Silhouette Flower Vases.
When it’s time to end the party, this loot will definitely draw some attention.
After evaluating all this party has to offer, we know little art critics will be in agreement that this Art Party is a masterpiece.
Food
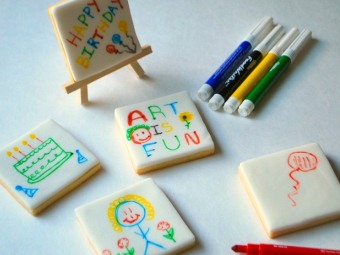
Your starving artists will devour this Artist’s Palette Birthday Cake and this platter of Paint Splatter Cupcakes. Tap into their creative side by presenting them with these Artist Canvas Cookies that they can draw on with edible markers. If crayons are more their thing, these Pretzel Crayons have a nice ring.
Messy Michelangelos
Makes 12
 1 Tbsp olive oil
- 1 lb ground beef
- 1 small onion, peeled and grated
- 1 large carrot, peeled, trimmed and grated
- ⅔ cup ketchup
- 2 Tbsp brown sugar
- 1 Tbsp Dijon mustard
- ½ tsp garlic powder
- 1 dz small buns
 1 Tbsp olive oil
- Warm olive oil in a medium skillet set over medium heat. Add ground beef and cook until no longer pink. Add onion and grated carrots and stir to combine, cooking for 2–3 minutes or until vegetables have softened.
- Add ketchup, brown sugar, mustard, and garlic powder to skillet and mix well with a wooden spoon. Reduce heat to low and simmer for 15 minutes.
- Spoon meat mixture onto the bottom half of the buns. Top with the second half and serve warm.
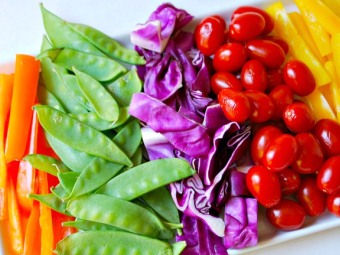
Colorful Crudites
 Red vegetables (cherry tomatoes, sliced red pepper, etc.)
- Orange vegetables (sliced carrots, orange pepper, etc.)
- Yellow vegetables (sliced yellow pepper, etc.)
- Green vegetables (snow/sugar snap peas, cucumber, celery, broccoli, etc.)
- Purple vegetables (cabbage, radicchio, cauliflower, etc.)
- Assorted dips
 Red vegetables (cherry tomatoes, sliced red pepper, etc.)
- Cut and slice vegetables and stack them in a group on a large serving platter.
- Arrange all the vegetables according to their color (i.e. put all of the red veggies together, etc.)
- Serve cold with assorted dips.
Artist’s Palette Birthday Cake
- Chocolate or vanilla cake recipe or boxed mix
- 2 cups vanilla icing
- Red, blue, green, yellow, orange gel paste food color
- Plastic paintbrushes
- 1” round cookie cutter
 Chocolate or vanilla cake recipe or boxed mix
- Bake cake in a 9” x 13” baking pan as per recipe direction. Remove cake from oven and allow it to cool completely. Once cooled, wrap the cake in two layers of plastic wrap and place in the freezer for at least one hour.
- Remove cake from freezer and cut edges to create a ‘palette’ shape. Using the round cookie cutter, cut a hole in the cake near the curve of the palette.
- Set aside ½ cup of the icing and frost the cake with the remainder, taking care to make the icing as smooth as possible. Place cake in the refrigerator for 30 minutes to set the icing.
- While the cake is in the refrigerator, divide the remaining icing into 5 equal portions and tint each one with a different food coloring to create the ‘paint’ icing for the palette.
- Remove cake from the refrigerator and smear the ‘paint’ icing onto the cake around the bottom of the palette. Dip two clean and unused paintbrushes in the icing to appear to paint-covered and lay them on the palette.
- Scatter a few paintbrushes around the cake and coat them with leftover icing, if desired.
Rainbow Fruit Cups
Color is the name of the game—send these Rainbow Fruit Cups with color wheel toppers for a spin around the table. You have to make a mess to create something great, and these Messy Michelangelos are just what the kids need to reach their artistic potential. And some Colourful Crudites will be a very complimentary side to snack on.
- Purple grapes, sliced in half
- Blueberries
- Kiwis, peeled and chopped
- Bananas, peeled and sliced
- Peaches, sliced
- Raspberries
- Colour wheel toppers
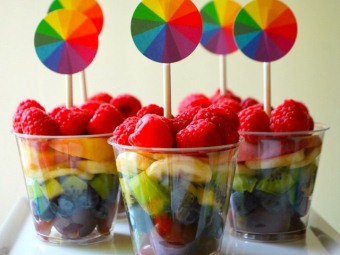 Purple grapes, sliced in half
- Fill small glasses or plastic cups with the fruit, starting with grapes, followed by blueberries, kiwis, bananas, peaches, and raspberries.
- Cut out color wheel toppers and affix them to wooden skewers or lollipop sticks and insert them into fruit cups.
- Serve cold.
Good to Know: If you want to make these more than 1 hour in advance, swap the bananas for pineapple, otherwise the bananas will brown.
Makes 16 cookies
- 1 batch of sugar cookie dough
- Pre-made white fondant
- Powdered sugar
- Light corn syrup
- Edible food markers
 1 batch of sugar cookie dough
Sugar cookie dough
- 1 cup butter
- ¼ cup cream cheese
- ½ cup granulated sugar
- 1 egg
- Pinch of salt
- 2 tsp of vanilla extract
- 3 cups flour
- 2 cups icing sugar
- 2–4 Tbsp water
- Preheat oven to 350 degrees.
- Cream the butter and cream cheese until fluffy.
- Add in sugar and beat until well incorporated. Add egg, salt, and vanilla and mix well.
- Add flour, one cup at a time, being careful not to over mix. Wrap the dough in plastic and chill for at least 1 hour.
- Roll the dough (½ inch thick) out onto a floured surface.
- Using a 3” x 3” square cookie cutter, cut out 16 cookies and place them on parchment-lined baking sheets. Bake for 13 minutes, rotating baking sheets halfway through. Allow cookies to cool completely.
- Lightly cover work surface with powdered sugar. Knead fondant with hands until it’s smooth and pliable and resembles Play-Doh. Using a rolling pin, roll fondant to ¼” thickness and cut out 16 squares using the same cookie cutter.
- When cookies are cool, use a pastry brush and cover the top of each with light corn syrup. Press a piece of fondant onto one of the cookies, lining up the sides evenly. Repeat with remaining cookies and allow fondant-covered cookies to dry for 1 hour.
- Draw on the fondant with edible food markers to create an original masterpiece.
Activities
Coffee Filter Butterfly Magnets
Best for: Ages 1 to 3
Kids will be flying high after getting crafty with this fun activity.
You’ll Need:
 Coffee filters
- Scissors
- Water-based markers
- Wooden clothespins
- Small googly eyes
- Pipe cleaners, cut in half
- Craft glue
- Spray bottle filled with water
- Small magnets
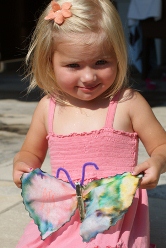 Coffee filters
How to Make:
- Fold your coffee filter in half. Cut along the two longest sides so that you end up with the ‘wings’ of your butterfly.
- Place butterfly wings, a clothespin, a set of googly eyes, and half a pipe cleaner at each child’s place. Make sure each child can reach a variety of markers.
- Have the children fill the entire coffee filter with lots of colors. The patterns can be random; the coloring doesn’t need to be pretty but you want to fill as much white space as possible.
- Once a child has filled the white space, take the spray bottle and lightly spritz the wings with water so that all the colors bleed together.
- Place the wings in a warm spot to dry.
- While the wings dry, have the children color their clothespins. These are the bodies of their butterflies.
- Glue a set of googly eyes on the short end of the clothespin (the end that opens).
- Glue a magnet to the backside of the clothespin near the top of the short end.
- Have the children fold their pipe cleaners in half forming a ‘v’ shape. They can wind the edges around a pencil or marker to form the antennae.
- When the wings have dried, simply open the clothespin and trap the middle of the wings in the clip part of the clothespin and then tuck in the antennae.